How to Mark E-mail as "Junk" in Mac Mail
To manually (and in future automatically) junk e-mails in Mac Mail:
- On the left side bar, navigate to your Inbox
- Select the e-mail you wish to identify as junk
- Click Mark as Junk
- Toolbar Method: In the Mail toolbar click the Junk button (it looks like a bin or a “thumbs down” icon)

- Menu Method: In the menu bar, go to Message > Mark > As Junk Mail
The e-mail will be moved to the Junk folder, and future messages from that sender may be filtered automatically.
How to Mark Email as Not Junk (Unjunk) in Mac Mail
- On the left sidebar, navigate to the Junk Folder
- Click on the legitimate e-mail you want to restore.
- Mark as Not Junk
- Toolbar Method: In the toolbar click the Not Junk button (shows as a “thumbs up” or “not junk” icon)
- Menu Method: Go to Message > Mark > As Not Junk Mail
The e-mail will move back to your inbox, and the sender will be “whitelisted” in the junk filter’s memory.
Customizing Junk Mail Settings
Mac Mail’s built-in filters learn from your actions. You can further customize how junk mail is handled:
- Open Settings: From the menu bar, select Mail > Settings (or Preferences in older versions)
- Click the Junk Mail Tab
- Adjust Filters: Choose how aggressively you want Mail to filter junk (e.g., Mark as junk mail but leave it in my Inbox, Move it to the Junk mailbox, or Perform custom actions).
- Trust Contacts: Enable Trust junk mail headers in messages or Exclude messages from my contacts to reduce false positives.
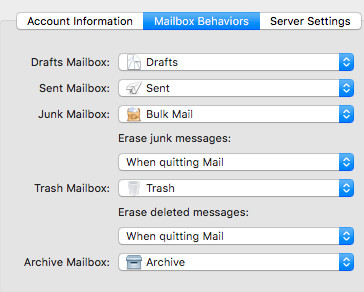
- One important setting is Mailbox Behaviors, which allows you to choose where to store junk (spam) messages — either locally on your Mac or on the mail server. Storing junk messages on the server ensures consistency across devices and helps improve spam filtering.